What types of connectors or terminals does an transformer oil tester support?

Transformer oil testers, also known as insulation oil testers or dielectric strength testers, are used to assess the dielectric strength and quality of insulating oils used in transformers and other electrical equipment. These testers typically support various types of connectors or terminals to facilitate the testing process and ensure compatibility with different oil sampling methods.

Here are some common types of connectors or terminals supported by transformer oil testers:

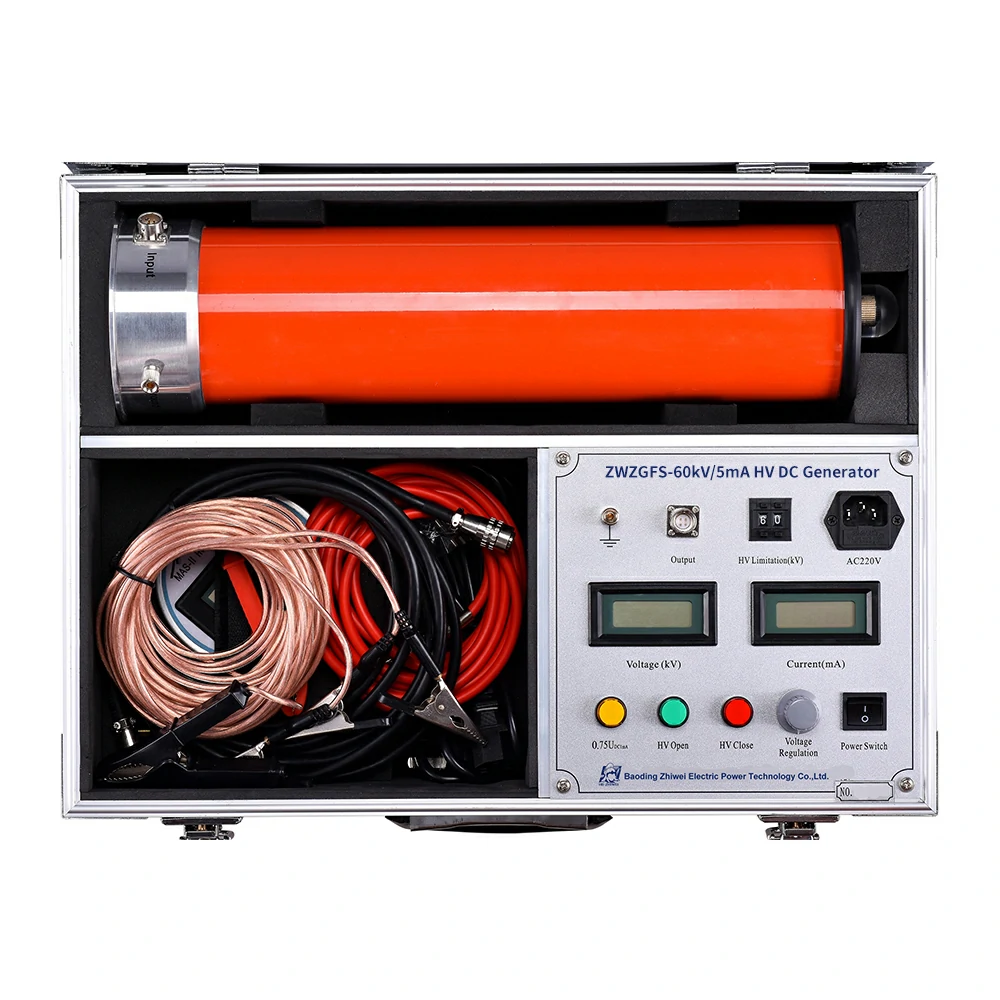
  1. Banana Jacks: Many transformer oil testers feature banana jacks as standard connectors for connecting test leads or electrodes. Banana jacks provide a secure and reliable connection and are compatible with banana plugs commonly used on test leads and accessories.
  2. Alligator Clips: Some transformer oil testers may come with alligator clips or crocodile clips for attaching to metal electrodes or test points on the oil sample container. Alligator clips provide a convenient way to make temporary connections and are suitable for a wide range of oil sampling containers and configurations.
  3. Spade Terminals: Transformer oil testers may also support spade terminals or blade connectors for connecting test leads or electrodes. Spade terminals are often used with ring terminals or spade lugs on test leads and can provide a secure connection to the oil sample container or test apparatus.
  4. Bayonet Fittings: Certain transformer oil testers may feature bayonet fittings or twist-lock connectors for attaching specialized test probes or electrodes. Bayonet fittings ensure a quick and secure connection and are commonly used with proprietary accessories or electrode assemblies.
  5. Threaded Terminals: Some transformer oil testers may include threaded terminals or screw terminals for connecting test leads or electrodes with threaded connectors. Threaded terminals offer a reliable connection and are compatible with threaded probes or electrodes used for oil sampling and testing.
  6. BNC Connectors: In some cases, transformer oil testers may support BNC (Bayonet Neill-Concelman) connectors for connecting coaxial cables or probes. BNC connectors are commonly used in laboratory and field-testing applications and provide a secure, impedance-matched connection for high-frequency signals.
  7. Lemo Connectors: Certain advanced transformer oil testers may feature Lemo connectors, which are precision connectors commonly used in instrumentation and measurement equipment. Lemo connectors offer high reliability, low noise, and secure connections suitable for high-precision testing applications.
  8. Custom Connectors: Depending on the specific model and manufacturer, transformer oil testers may support custom connectors or terminals designed for specific applications or testing requirements. These custom connectors may include proprietary designs or configurations optimized for particular oil sampling methods or test setups.

Overall, transformer oil testers support a variety of connectors or terminals to accommodate different oil sampling methods, test configurations, and user preferences. The choice of connector type may depend on factors such as compatibility with existing test leads or accessories, ease of use, and suitability for the intended testing application.

What types of faults can be detected using an DC tester?

DC testers, also known as DC hipot testers or DC high-potential testers, are versatile instruments used to perform high-voltage insulation testing on electrical components and systems. These testers apply a high DC voltage to the insulation under test to assess its integrity and detect potential faults or weaknesses.

Here are some types of faults that can be detected using a DC tester:

  1. Insulation Breakdown: DC testers can detect insulation breakdowns or dielectric failures within electrical insulation systems. When the applied DC voltage exceeds the insulation’s dielectric strength, it can cause a breakdown or flashover, indicating a fault in the insulation.
  2. Partial Discharge (PD): Partial discharge is a localized breakdown of insulation that occurs when the insulation is subjected to high electric field stress. DC testers can detect partial discharge activity by monitoring the leakage current or observing characteristic signals generated by PD events. PD is an early indicator of insulation degradation and can lead to insulation failure if left unaddressed.
  3. Contaminants or Moisture: DC testers can identify insulation faults caused by contaminants, such as dust, dirt, moisture, or conducting particles, that may degrade the insulation’s dielectric properties. These contaminants can create weak points in the insulation and lead to insulation breakdown or reduced insulation resistance.
  4. Void or Delamination: DC testers can detect voids or delaminations within insulation materials, such as air gaps or separation between layers. These defects can compromise the insulation’s integrity and increase the risk of electrical breakdown under high voltage stress.
  5. Cracks or Damage: DC testers can identify cracks, fractures, or physical damage to insulation materials that may weaken the insulation and reduce its ability to withstand voltage stress. Cracks can provide paths for electrical arcing or breakdown, leading to insulation failure.
  6. Aging or Degradation: DC testers can assess the condition of insulation materials over time and detect signs of aging, degradation, or deterioration. Insulation materials may degrade due to factors such as thermal stress, mechanical stress, chemical exposure, or environmental conditions, leading to reduced dielectric strength and increased risk of insulation failure.
  7. Poor Joint or Connection: DC testers can detect insulation faults associated with poor joints, connections, or terminations in electrical systems. High-voltage stress at joints or terminations can cause localized breakdowns or insulation failures, compromising the overall integrity of the electrical system.

Overall, DC testers are valuable tools for assessing the insulation quality, identifying potential faults or weaknesses, and ensuring the reliability and safety of electrical components and systems. By detecting insulation faults early, DC testers help prevent costly downtime, equipment damage, and safety hazards associated with insulation failure.

What is the procedure for adjusting the Small Pouch Alcohol Machine settings for different types of wet wipes?

Adjusting the settings of a Small Pouch Alcohol Machine for different types of wet wipes involves several steps to ensure optimal performance and product quality.

Here is a general procedure for making these adjustments:

  1. Review Manufacturer Guidelines: Refer to the manufacturer’s instruction manual or guidelines for the Small Pouch Alcohol Machine to understand the recommended settings and parameters for different types of wet wipes.
  2. Inspect and Clean the Machine: Before making any adjustments, ensure that the machine is clean and free from any residue or contaminants that could affect the performance of the wet wipes. Clean all contact surfaces, rollers, and components as needed.
  3. Select the Desired Wet Wipes Type: Identify the specific type of wet wipes you will be producing, such as antibacterial wipes, baby wipes, makeup remover wipes, or surface disinfectant wipes. Consider factors such as material composition, thickness, size, and moisture content.
  4. Adjust Moisture Content: If the moisture content of the wet wipes needs to be adjusted, modify the settings of the moisture control system on the machine. This may involve adjusting the speed of the liquid applicator, the temperature of the drying chamber, or the dwell time of the wipes.
  5. Modify Folding and Packaging Parameters: Depending on the type of wet wipes, you may need to adjust the folding and packaging parameters to accommodate different folding patterns, sheet counts, or package sizes. Modify settings such as folding speed, folding method, package size, and seal strength accordingly.
  6. Calibrate Cutting and Sealing Mechanisms: Ensure that the cutting and sealing mechanisms of the machine are properly calibrated to produce clean and precise cuts and seals on the wet wipes pouches. Adjust the cutting blades, heat sealers, or ultrasonic sealers as needed.
  7. Test Run and Fine-Tuning: Perform a test run of the machine using the adjusted settings for the specific type of wet wipes. Small Pouch Wet Wipes Alcohol Machine Monitor the production process closely and make any necessary fine-tuning adjustments to optimize performance and product quality.
  8. Quality Control Checks: Conduct quality control checks on the produced wet wipes to ensure they meet the desired specifications and standards. Evaluate factors such as moisture content, folding accuracy, seal integrity, packaging appearance, and overall product consistency.
  9. Document Settings and Parameters: Record the adjusted settings and parameters for producing the specific type of wet wipes in the machine’s production log or documentation. This information will serve as a reference for future production runs and troubleshooting.
  10. Monitor Performance: Continuously monitor the performance of the Small Pouch Alcohol Machine during production to ensure that the adjusted settings are maintained and that the wet wipes meet quality standards consistently.

By following these steps, operators can effectively adjust the settings of a Small Pouch Alcohol Machine to produce different types of wet wipes with optimal quality and efficiency. Regular monitoring, maintenance, and documentation of settings are essential for ensuring reliable and consistent performance.

What are the safety protocols for operating the wet towel machine production line?

Safety protocols for operating a wet towel machine production line are essential to ensure the well-being of personnel, prevent accidents, and maintain a safe working environment.

Here are some key safety protocols that should be followed:

  1. Training and Education: Provide comprehensive training to all personnel involved in operating the wet towel machine production line. Ensure they are familiar with the equipment, machinery, safety procedures, and emergency protocols.
  2. Personal Protective Equipment (PPE): Require all employees to wear appropriate PPE, including safety goggles, gloves, hearing protection, and protective clothing, as necessary to prevent injuries from moving machinery, chemicals, or flying debris.
  3. Machine Guarding: Ensure that all moving parts of the wet towel machine are properly guarded to prevent accidental contact with machinery components. Install safety barriers, interlocks, and emergency stop buttons to minimize the risk of injuries.
  4. Lockout/Tagout (LOTO): Implement lockout/tagout procedures to control hazardous energy sources during maintenance, repair, or cleaning activities. Ensure that the machine is properly de-energized, locked out, and tagged before any servicing work is performed.
  5. Slip, Trip, and Fall Prevention: Keep the production area clean, organized, and free from obstacles to reduce the risk of slips, trips, and falls. Use anti-slip flooring, mats, and warning signs in areas prone to wet or slippery conditions.
  6. Chemical Safety: Properly handle, store, and dispose of chemicals used in the production process, such as cleaning agents, disinfectants, and sanitizers. Provide training on chemical hazards, safe handling practices, wet towel machine production line and emergency response procedures.
  7. Fire Safety: Install and maintain fire detection and suppression systems, such as smoke detectors, fire extinguishers, and sprinkler systems, in the production area. Conduct regular fire drills and ensure that employees know the location of emergency exits and evacuation routes.
  8. Electrical Safety: Inspect electrical components, wiring, and connections regularly to identify potential hazards or defects. Ensure that electrical panels are properly labeled, and circuit breakers are accessible in case of emergencies.
  9. Material Handling: Train employees in safe material handling techniques to prevent strains, sprains, and musculoskeletal injuries. Use mechanical aids such as forklifts, pallet jacks, or conveyors to lift and transport heavy loads whenever possible.
  10. Emergency Response: Establish clear protocols for responding to emergencies, including medical emergencies, machinery malfunctions, chemical spills, or fires. Designate trained personnel to act as first responders and provide basic first aid and CPR training to employees.
  11. Regular Inspections and Maintenance: Conduct routine inspections and maintenance checks on the wet towel machine and associated equipment to identify and address potential safety hazards or mechanical issues promptly.
  12. Safety Culture: Foster a culture of safety by encouraging open communication, reporting of hazards or near misses, and active participation in safety training programs and initiatives. Empower employees to take ownership of their safety and the safety of their coworkers.

By following these safety protocols, companies can mitigate risks, protect workers from harm, and ensure the safe and efficient operation of the wet towel machine production line. Regular training, ongoing supervision, and adherence to best practices are essential to maintaining a safe workplace environment.

How does the resolution of the 1kw fiber laser process affect the clarity and detail of the final product?

The resolution of a 1kW fiber laser process plays a significant role in determining the clarity and detail of the final product in laser engraving or cutting applications.

Here’s how resolution impacts the outcome:

  1. Detail and Precision: Higher resolution allows the laser to achieve finer details and higher precision in engraving or cutting. With finer resolution, the laser beam can accurately reproduce intricate patterns, small text, and complex designs, resulting in a final product with sharper edges and smoother curves.
  2. Edge Quality: Higher resolution helps improve the edge quality of the engraved or cut features. Finer resolution allows for smoother and more defined edges, reducing the need for post-processing to clean up rough edges or jagged lines. This results in a final product with cleaner and crisper outlines.
  3. Engraving Depth Control: Resolution also affects the control over engraving depth. A higher resolution allows for more precise control over the depth of engraving, enabling subtle gradations in depth to create three-dimensional effects or shading. This capability enhances the clarity and realism of engraved images or designs.
  4. Fine Text and Graphics: Higher resolution is particularly important for engraving small text and intricate graphics. 1kw fiber laser Finer details and smaller features can be accurately reproduced with higher resolution, ensuring legibility and fidelity to the original design. This is especially critical for applications such as product labeling, serial numbering, or artistic engraving.
  5. Smoothness of Surfaces: In laser cutting applications, resolution affects the smoothness of cut surfaces. Higher resolution allows for finer control over the laser beam’s trajectory, reducing the occurrence of rough surfaces or burrs along cut edges. This results in a final product with smoother and more aesthetically pleasing surfaces.
  6. Overall Visual Appeal: Ultimately, the resolution of the laser process contributes to the overall visual appeal and quality of the final product. Higher resolution enables the production of finer, more intricate designs with greater clarity and detail, enhancing the perceived value and professionalism of the finished work.

In summary, the resolution of a 1kW fiber laser process directly influences the clarity, detail, and quality of the final product in laser engraving or cutting applications. Higher resolution allows for finer control over the laser beam, resulting in sharper details, smoother edges, and overall superior results.

How does a fiber laser 1kw handle engraving on uneven or non-flat surfaces?


Engraving on uneven or non-flat surfaces with a 1kW fiber laser presents some challenges, but there are techniques and strategies that can be employed to handle such situations effectively:

  1. Auto-Focusing Systems: Some fiber laser systems are equipped with auto-focusing capabilities that can adjust the focal length of the laser beam dynamically. This allows the laser to maintain optimal focus even on surfaces with varying heights or irregularities.
  2. Surface Mapping: Prior to engraving, the surface of the material can be mapped using sensors or cameras attached to the laser system. This data can then be used to adjust the position of the laser beam in real-time, compensating for any variations in surface height to ensure consistent engraving depth.
  3. Adaptive Engraving Paths: Software-controlled engraving paths can be adjusted dynamically based on the surface topology of the material. By following the contours of the surface, the laser can maintain a consistent distance from the material, resulting in uniform engraving depth across the entire surface.
  4. Variable Power and Speed Settings: Adjusting the power and speed of the laser can help compensate for variations in surface height or material density. Higher power settings may be used to engrave deeper into raised areas, while lower power settings may be suitable for recessed areas or valleys.
  5. Custom Jigs or Fixtures: For irregularly shaped or contoured surfaces, custom jigs or fixtures can be used to hold the material in place and ensure a consistent engraving surface. These fixtures can be designed to accommodate the specific shape of the material and provide a flat, stable surface for engraving.
  6. Manual Adjustment: In some cases, fiber laser 1kw operators may need to manually adjust the focus or position of the laser head to account for variations in surface height. This requires careful monitoring and adjustment during the engraving process to ensure uniform engraving depth.
  7. Multiple Passes: For highly irregular surfaces, multiple engraving passes may be necessary to achieve the desired depth and clarity. By gradually building up the engraving layer by layer, the laser can effectively engrave on surfaces with significant variations in height.

Overall, handling engraving on uneven or non-flat surfaces with a 1kW fiber laser requires a combination of advanced technology, software control, and operator expertise. By employing these techniques, it is possible to achieve high-quality engraving results on a wide range of surface geometries and materials.

How does a engraving machine handle power fluctuations or interruptions during operation?


Engraving machines typically handle power fluctuations or interruptions during operation through a combination of built-in safety features and control mechanisms. Here’s how they typically manage such situations:

  1. Power Protection Systems: Engraving machines often incorporate power protection systems such as surge protectors or voltage regulators to safeguard sensitive electronic components from voltage spikes or fluctuations. These systems help stabilize the incoming power supply and prevent damage to the machine’s internal circuitry.
  2. Uninterruptible Power Supply (UPS): Some engraving machines may be equipped with UPS units that provide temporary power backup in the event of a sudden power outage or interruption. UPS units typically have internal batteries that can keep the machine running for a short period, desk top engraver allowing users to save their work and safely shut down the machine or resume operations once power is restored.
  3. Resume Functionality: Many modern engraving machines feature a resume function that automatically saves the progress of the engraving job in case of a power interruption. This allows the machine to resume engraving from the exact point where it left off once power is restored, minimizing material waste and ensuring continuity in the production process.
  4. Emergency Stop Button: Engraving machines are equipped with emergency stop buttons or switches that enable operators to quickly halt operations in the event of a power fluctuation, equipment malfunction, or other emergencies. This helps prevent accidents and damage to the machine or workpiece.
  5. Automatic Restart: Some engraving machines may have automatic restart functionality that initiates a self-check process upon power restoration to ensure that all systems are functioning properly before resuming operations. This helps prevent errors or damage that could result from restarting the machine prematurely.
  6. Diagnostic Systems: Engraving machines may include diagnostic systems that monitor various parameters such as power levels, temperature, and system status in real-time. These systems can detect anomalies or irregularities indicative of power fluctuations or interruptions and alert operators to take appropriate action.
  7. Data Recovery: In the event of a power interruption or unexpected shutdown, engraving machines may have data recovery mechanisms that allow operators to retrieve and restore previously saved design files or engraving parameters. mini laser engraving machine This helps minimize data loss and ensures that work can be resumed without having to start from scratch.

Overall, engraving machines employ a combination of protective measures and control mechanisms to mitigate the impact of power fluctuations or interruptions during operation, ensuring the safety of both the equipment and the engraved products.

How does a small engraver machine handle varying densities or thicknesses of plexiglass material?

Small engraving machines typically handle varying densities or thicknesses of plexiglass material through adjustable settings and adaptable mechanisms. Here’s how they typically manage such variations:

  1. Variable Power and Speed Settings: Engraving machines often allow users to adjust the power and speed of the engraving process. This flexibility enables operators to optimize the settings based on the density and thickness of the plexiglass material being engraved. Higher power settings may be used for denser or thicker materials, while lower power settings may be suitable for thinner or less dense materials.
  2. Focus Adjustment: Some engraving machines feature adjustable focal lengths or focus points, allowing operators to fine-tune the focus of the laser beam based on the thickness of the plexiglass material. small engraver machine Proper focus ensures optimal engraving quality and clarity, regardless of material thickness.
  3. Automatic Z-Axis Adjustment: Certain engraving machines incorporate automatic Z-axis adjustment mechanisms that can accommodate varying material thicknesses. These systems adjust the height of the engraving head or the workpiece platform to maintain the optimal focal distance between the laser beam and the material surface, ensuring consistent engraving depth across different thicknesses of plexiglass.
  4. Material Calibration: Some engraving machines offer material calibration features that allow users to calibrate the machine’s settings based on the specific properties of the plexiglass material being used, including its density and thickness. This ensures accurate and consistent engraving results, regardless of variations in material characteristics.
  5. Multiple Passes or Layers: In cases where the plexiglass material is particularly thick or dense, small engraving machines may perform multiple engraving passes or layers to achieve the desired depth or clarity. tiny laser engraver Operators can adjust the parameters for each pass to gradually engrave deeper into the material while maintaining precision and quality.
  6. Test Cuts and Samples: Before initiating full-scale engraving jobs, operators may perform test cuts or engraving samples on scrap pieces of plexiglass material to determine the optimal settings for the specific material thickness and density. This experimentation helps fine-tune the engraving parameters and ensures optimal results when engraving the actual workpieces.

By incorporating these adjustable settings and adaptable mechanisms, small engraving machines can effectively handle varying densities or thicknesses of plexiglass material, providing users with the flexibility and precision needed to achieve high-quality engraving results across a range of applications.

How do high-quality Spark Plug enhance vehicle stability and control?

High-quality spark plugs contribute to vehicle stability and control indirectly by ensuring optimal engine performance, which directly affects how the vehicle accelerates, decelerates, and responds to driver inputs.

Here’s how high-quality spark plugs enhance stability and control:

  1. Improved Engine Efficiency: High-quality spark plugs ignite the air-fuel mixture more efficiently, leading to more complete combustion within the engine cylinders. This results in improved engine efficiency, which translates to smoother and more consistent power delivery. A properly functioning engine provides a stable and predictable driving experience, enhancing vehicle stability and control.
  2. Enhanced Acceleration: High-quality spark plugs ensure consistent ignition of the air-fuel mixture, resulting in smoother and more responsive acceleration. A well-maintained engine with properly functioning spark plugs delivers power consistently, allowing the vehicle to accelerate smoothly without hesitation or surging. This enhances driver confidence and control, especially during overtaking maneuvers or merging onto highways.
  3. Optimized Fuel Economy: Efficient combustion facilitated by high-quality spark plugs leads to improved fuel economy. When the engine burns fuel more effectively, it requires less fuel to produce the same amount of power. China Spark Plug supplier This not only reduces fuel consumption but also helps maintain a more stable and predictable fuel delivery system, contributing to overall vehicle stability and control.
  4. Reduced Engine Vibration: Proper ignition provided by high-quality spark plugs minimizes engine misfires and reduces engine vibration. A smoother-running engine produces fewer vibrations, which can affect vehicle stability and control, especially at higher speeds. By reducing engine vibration, high-quality spark plugs contribute to a more comfortable and stable driving experience.
  5. Enhanced Engine Response: High-quality spark plugs improve engine responsiveness by ensuring consistent ignition timing and combustion. A responsive engine reacts quickly to driver inputs, allowing for precise control over vehicle speed and direction. This enhances overall vehicle stability and control, particularly in dynamic driving situations such as cornering or maneuvering through traffic.
  6. Reduced Emissions: Efficient combustion facilitated by high-quality spark plugs results in lower emissions of harmful pollutants such as carbon monoxide (CO) and hydrocarbons (HC). By reducing emissions, high-quality spark plugs help maintain a cleaner and healthier environment while also ensuring compliance with emissions regulations. This contributes to overall vehicle stability and control by promoting smoother operation and minimizing the risk of engine performance issues related to emissions control systems.

In summary, high-quality spark plugs enhance vehicle stability and control by improving engine efficiency, acceleration, fuel economy, reducing engine vibration, enhancing engine response, and reducing emissions. By ensuring consistent ignition and combustion, high-quality spark plugs contribute to a smoother and more predictable driving experience, allowing drivers to maintain better control over their vehicles in various driving conditions.

How does the warranty coverage differ between standard and premium Rubber Bushing?

Warranty coverage for rubber bushings can vary significantly depending on whether they are standard or premium quality.

Here’s a general comparison of how warranty coverage may differ between the two:

  1. Standard Rubber Bushings:
    • Duration: Standard rubber bushings typically come with a limited warranty that may range from 1 year to 3 years, depending on the manufacturer and specific product.
    • Coverage: The warranty for standard rubber bushings usually covers defects in materials and workmanship under normal use and conditions. This may include issues such as premature wear, splitting, or deterioration of the rubber material.
    • Exclusions: Standard warranties may have limitations or exclusions, such as damage caused by improper installation, misuse, neglect, or accidents. Wear and tear over time may also be excluded from coverage.
  2. Premium Rubber Bushings:
    • Duration: Premium rubber bushings often come with an extended or lifetime warranty, reflecting the manufacturer’s confidence in the quality and durability of the product.
    • Coverage: The warranty for premium rubber bushings typically offers comprehensive coverage for a wider range of defects and issues. China Rubber Bushing supplier In addition to defects in materials and workmanship, it may cover issues such as abnormal wear, noise, or performance degradation over time.
    • Exclusions: Premium warranties may still have certain limitations or exclusions, but they are generally more generous compared to standard warranties. They may exclude damage from accidents or misuse but often provide coverage for wear and tear over the lifetime of the product.
  3. Additional Benefits: Premium rubber bushings may come with additional benefits or perks as part of the warranty package. This could include features such as free replacement if the bushings fail within a specified period, technical support, or reimbursement for labor costs associated with warranty claims.

Overall, the main difference between standard and premium rubber bushing warranties lies in the duration of coverage, the extent of coverage for defects and issues, and any additional benefits or perks offered. Premium rubber bushings typically come with longer warranties, more comprehensive coverage, and additional benefits compared to standard options, reflecting their higher quality and performance. It’s essential for consumers to review the specific terms and conditions of the warranty provided by the manufacturer before making a purchase to understand the extent of coverage and any exclusions that may apply.

How does the factory manage inventory and restocking for regularly ordered leather patches for hats?

Managing inventory and restocking for regularly ordered leather patches for hats involves efficient planning, monitoring, and communication between the factory and its customers.

Here are key aspects of how a factory might handle inventory and restocking for such products:

  1. Inventory Tracking System:
    • Implement a robust inventory tracking system to monitor the stock levels of leather patches for hats. This system can be manual or automated, depending on the scale of production.
  2. Set Minimum Stock Levels:
    • Establish minimum stock levels for leather patches to ensure that there is enough inventory to fulfill regular orders without causing delays. This helps in anticipating restocking needs.
  3. Regular Production Schedules:
    • Develop regular production schedules based on historical order patterns. This involves forecasting demand, considering lead times, and planning production runs to meet expected orders.
  4. Customer Demand Analysis:
    • Analyze customer demand patterns and order frequency to identify trends. This analysis assists in adjusting production plans and inventory levels accordingly.
  5. Communication with Customers:
    • Maintain open communication with customers to gather information on upcoming orders and demand forecasts. Regular communication helps align production schedules with customer needs.
  6. Lead Time Considerations:
    • Factor in the lead time required for manufacturing leather patches. Knowing the time it takes from order placement to production completion allows for timely restocking.
  7. Supplier Relationships:
    • Cultivate strong relationships with suppliers of raw materials, such as leather. A reliable and efficient supply chain is essential for maintaining consistent production and inventory levels.
  8. Order Confirmation Process:
    • Implement a streamlined order confirmation process. Once a customer places an order, the factory confirms the order details, leather patches for hats delivery timelines, and ensures that there is sufficient stock to fulfill the order.
  9. Emergency Stock:
    • Keep emergency stock or safety stock to handle unforeseen circumstances, such as sudden increases in demand or delays in the supply chain.
  10. Demand Forecasting:
    • Utilize demand forecasting tools and techniques to predict future order volumes. This involves analyzing historical data, market trends, and customer feedback to make informed predictions.
  11. Efficient Manufacturing Practices:
    • Optimize manufacturing processes to enhance efficiency and reduce lead times. This includes streamlining production workflows, minimizing downtime, and ensuring quality control measures.
  12. Regular Audits and Cycle Counts:
    • Conduct regular audits and cycle counts to verify physical inventory levels against recorded levels. This helps identify discrepancies and ensures accurate stock information.
  13. Technology Integration:
    • Integrate technology solutions, such as inventory management software, to automate and streamline inventory tracking and restocking processes.
  14. Flexible Production Capacities:
    • Maintain flexibility in production capacities to scale up or down based on fluctuations in demand. This adaptability allows the factory to respond effectively to changing order volumes.
  15. Reorder Point System:
    • Implement a reorder point system, where restocking is triggered when inventory levels reach a predetermined threshold. This helps prevent stockouts and minimizes the risk of overstocking.

By employing these strategies, a factory can effectively manage inventory and restocking for regularly ordered leather patches for hats, ensuring a seamless supply chain and meeting customer demands efficiently.

What is the warranty or guarantee policy for custom jean buttons, if any?

The warranty or guarantee policy for custom jean buttons can vary between manufacturers and suppliers. When ordering custom jean buttons, it’s crucial to clarify and understand the specific terms and conditions of the warranty or guarantee offered by the supplier.

Here are some general considerations:

  1. Duration of Warranty:
    • Inquire about the duration of the warranty or guarantee. Some suppliers may offer a limited warranty that covers a specific period after the purchase.
  2. Conditions for Warranty Coverage:
    • Understand the conditions under which the warranty or guarantee applies. This may include proper use and care of the jean buttons according to provided instructions.
  3. Defective Products:
    • Determine how the supplier defines and handles defective products. The warranty might cover manufacturing defects, but it’s essential to know the specific criteria for determining defects.
  4. Return and Replacement Process:
    • Clarify the process for returns and replacements under the warranty. Know whether the supplier provides a return shipping label or if there are any associated costs.
  5. Customer Responsibilities:
    • Understand any responsibilities or requirements for the customer to maintain eligibility for warranty coverage. custom jean button This may include providing proof of purchase or adhering to specific care instructions.
  6. Exclusions and Limitations:
    • Be aware of any exclusions or limitations within the warranty policy. Some warranties may exclude damages caused by misuse, alterations, or normal wear and tear.
  7. Communication Channels:
    • Identify the communication channels through which warranty claims should be submitted. This may include contacting customer support via email, phone, or an online portal.
  8. Refund or Replacement Options:
    • Inquire about the available options for resolution, such as whether the supplier offers refunds, replacements, or store credit for products covered by the warranty.
  9. Documented Warranty Terms:
    • Request a copy of the documented warranty terms or guarantee policy. Having this information in writing ensures clarity and helps avoid misunderstandings.
  10. Customer Reviews and Feedback:
    • Check customer reviews and feedback regarding the supplier’s warranty policy. This can provide insights into the actual experiences of other customers with warranty claims.

It’s crucial to discuss and confirm these details with the supplier before placing an order for custom jean buttons. Additionally, keeping records of the purchase, including invoices and warranty documentation, is advisable for reference in case of any issues.

Remember that the specific terms of warranties or guarantees can vary, so thorough communication with the supplier is key to a clear understanding of the protection offered for custom jean buttons.